Site-to-site
OpenVPN is popular for client-server setups, but its site-to-site mode is less common and often not supported by router appliances. Despite limited support, it is effective for quickly establishing tunnels between routers.
As of VyOS 1.4, OpenVPN site-to-site mode can use either pre-shared keys or x.509 certificates.
Pre-shared key mode is now deprecated and will be removed from future OpenVPN versions. VyOS will also discontinue support for this option because pre-shared keys are significantly less secure than TLS.
We will configure OpenVPN with self-signed certificates, and then discuss the legacy pre-shared key mode.
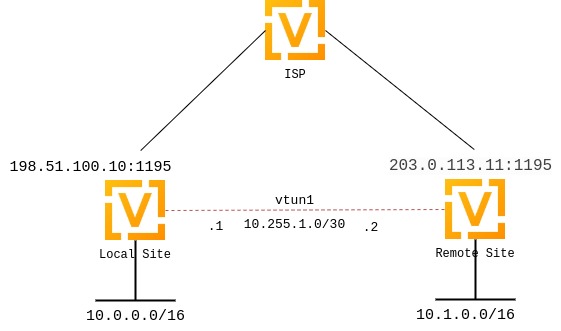
In both cases, we will use the following settings:
The public IP address of the local VPN endpoint is 198.51.100.10.
The public IP address of the remote VPN endpoint is 203.0.113.11.
The tunnel uses 10.255.1.1 for the local IP address and 10.255.1.2 for the remote IP address.
The local site has a subnet of 10.0.0.0/16.
The remote site has a subnet of 10.1.0.0/16.
The official OpenVPN port 1194 is reserved for client VPN. For site-to-site VPN, port 1195 is used.
The
persistent-tunneldirective allows us to configure tunnel-related attributes, such as firewall policy, as we would on any standard network interface.If known, the remote router’s IP address can be configured using the
remote-hostdirective. If unknown, it can be omitted. We assume the remote router has a dynamic IP address.
Set up site-to-site certificates
Deploying a complete Public Key Infrastructure (PKI) with a Certificate Authority (CA) would overcomplicate site-to-site OpenVPN setups, which are primarily designed for simplicity. To keep their configuration simple without compromising security, VyOS 1.4 and later lets you verify self-signed certificates using certificate fingerprints.
Generate a self-signed certificate on each router, preferably using the
Elliptic Curve (EC) type. In configuration mode, run the following command:
run generate pki certificate self-signed install <name>. This adds the
certificate to the configuration session’s pki subtree. Review and commit
the changes.
vyos@vyos# run generate pki certificate self-signed install openvpn-local
Enter private key type: [rsa, dsa, ec] (Default: rsa) ec
Enter private key bits: (Default: 256)
Enter country code: (Default: GB)
Enter state: (Default: Some-State)
Enter locality: (Default: Some-City)
Enter organization name: (Default: VyOS)
Enter common name: (Default: vyos.io)
Do you want to configure Subject Alternative Names? [y/N]
Enter how many days certificate will be valid: (Default: 365)
Enter certificate type: (client, server) (Default: server)
Note: If you plan to use the generated key on this router, do not encrypt the private key.
Do you want to encrypt the private key with a passphrase? [y/N]
2 value(s) installed. Use "compare" to see the pending changes, and "commit" to apply.
[edit]

vyos@vyos# compare
[pki]
+ certificate openvpn-local {
+     certificate "MIICJTCCAcugAwIBAgIUMXLfRNJ5iOjk/uAZqUe4phW8MdgwCgYIKoZIzj0EAwIwVzELMAkGA1UEBhMCR0IxEzARBgNVBAgMClNvbWUtU3RhdGUxEjAQBgNVBAcMCVNvbWUtQ2l0eTENMAsGA1UECgwEVnlPUzEQMA4GA1UEAwwHdnlvcy5pbzAeFw0yMzA5MDcyMTQzMTNaFw0yNDA5MDYyMTQzMTNaMFcxCzAJBgNVBAYTAkdCMRMwEQYDVQQIDApTb21lLVN0YXRlMRIwEAYDVQQHDAlTb21lLUNpdHkxDTALBgNVBAoMBFZ5T1MxEDAOBgNVBAMMB3Z5b3MuaW8wWTATBgcqhkjOPQIBBggqhkjOPQMBBwNCAASp7D0vE3SKSAWAzr/lw9Eq9Q89r247AJR6ec/GT26AIcVA1bsongV1YaWvRwzTPC/yi5pkzV/PcT/WU7JQIyMWo3UwczAMBgNVHRMBAf8EAjAAMA4GA1UdDwEB/wQEAwIHgDATBgNVHSUEDDAKBggrBgEFBQcDATAdBgNVHQ4EFgQUBrAxRdFppdG/UBRdo7qNyHutaTQwHwYDVR0jBBgwFoAUBrAxRdFppdG/UBRdo7qNyHutaTQwCgYIKoZIzj0EAwIDSAAwRQIhAI2+8C92z9wTcTWkQ/goRxs10EBC+h78O+vgo9k97z5iAiBSeqfaVr5taQTS31+McGTAK3cYWNTg0DlOBI8aKO2oRg=="
+     private {
+         key "MIGHAgEAMBMGByqGSM49AgEGCCqGSM49AwEHBG0wawIBAQQgtOeEb0dMb5P/2Exi09WWvk6Cvz0oOBoDuP68ZimS2LShRANCAASp7D0vE3SKSAWAzr/lw9Eq9Q89r247AJR6ec/GT26AIcVA1bsongV1YaWvRwzTPC/yi5pkzV/PcT/WU7JQIyMW"
+     }
+ }

[edit]

vyos@vyos# commit
You do not need to copy the certificate to the other router. Instead, retrieve its SHA-256 fingerprint. Since OpenVPN currently supports only SHA-256 fingerprints, use the following command:
vyos@vyos# run show pki certificate openvpn-local fingerprint sha256
5C:B8:09:64:8B:59:51:DC:F4:DF:2C:12:5C:B7:03:D1:68:94:D7:5B:62:C2:E1:83:79:F1:F0:68:B2:81:26:79
Note
Certificate names are arbitrary. While openvpn-local and
openvpn-remote are used here, you may choose any names.
Repeat the procedure on the other router.
Set up site-to-site OpenVPN
Local configuration:
Configure the tunnel:

set interfaces openvpn vtun1 mode site-to-site
set interfaces openvpn vtun1 protocol udp
set interfaces openvpn vtun1 persistent-tunnel
set interfaces openvpn vtun1 remote-host '203.0.113.11'                         # Public IP of the other side
set interfaces openvpn vtun1 local-port '1195'
set interfaces openvpn vtun1 remote-port '1195'
set interfaces openvpn vtun1 local-address '10.255.1.1'                         # Local IP of vtun interface
set interfaces openvpn vtun1 remote-address '10.255.1.2'                        # Remote IP of vtun interface
set interfaces openvpn vtun1 tls certificate 'openvpn-local'                    # The self-signed certificate
set interfaces openvpn vtun1 tls peer-fingerprint <remote cert fingerprint>     # The output of 'run show pki certificate <name> fingerprint sha256' on the remote router
set interfaces openvpn vtun1 tls role active
Remote configuration:
set interfaces openvpn vtun1 mode site-to-site
set interfaces openvpn vtun1 protocol udp
set interfaces openvpn vtun1 persistent-tunnel
set interfaces openvpn vtun1 remote-host '198.51.100.10'                         # Pub IP of other site
set interfaces openvpn vtun1 local-port '1195'
set interfaces openvpn vtun1 remote-port '1195'
set interfaces openvpn vtun1 local-address '10.255.1.2'                          # Local IP of vtun interface
set interfaces openvpn vtun1 remote-address '10.255.1.1'                         # Remote IP of vtun interface
set interfaces openvpn vtun1 tls certificate 'openvpn-remote'                    # The self-signed certificate
set interfaces openvpn vtun1 tls peer-fingerprint <local cert fingerprint>       # The output of 'run show pki certificate <name> fingerprint sha256 on the local router
set interfaces openvpn vtun1 tls role passive
Set up firewall exceptions
To allow OpenVPN traffic to pass through the WAN interface, create a firewall exception:
set firewall ipv4 name OUTSIDE_LOCAL rule 10 action 'accept'
set firewall ipv4 name OUTSIDE_LOCAL rule 10 description 'Allow established/related'
set firewall ipv4 name OUTSIDE_LOCAL rule 10 state 'established'
set firewall ipv4 name OUTSIDE_LOCAL rule 10 state 'related'
set firewall ipv4 name OUTSIDE_LOCAL rule 20 action 'accept'
set firewall ipv4 name OUTSIDE_LOCAL rule 20 description 'OpenVPN_IN'
set firewall ipv4 name OUTSIDE_LOCAL rule 20 destination port '1195'
set firewall ipv4 name OUTSIDE_LOCAL rule 20 log
set firewall ipv4 name OUTSIDE_LOCAL rule 20 protocol 'udp'
Apply the OUTSIDE_LOCAL firewall group to the WAN interface and to the input filter for traffic destined for the router itself:
set firewall ipv4 input filter rule 10 action 'jump'
set firewall ipv4 input filter rule 10 inbound-interface name eth0
set firewall ipv4 input filter rule 10 jump-target OUTSIDE_LOCAL
Static routing:
Configure static routes by referencing the tunnel interface. For example, if
the local router’s network is 10.0.0.0/16 and the remote router’s network
is 10.1.0.0/16, define the routes as follows:
Local configuration:
set protocols static route 10.1.0.0/16 interface vtun1
Remote configuration:
set protocols static route 10.0.0.0/16 interface vtun1
As with standard Ethernet interfaces, you can apply firewall policies to the tunnel interface for input, output, and forward directions.
If you use multiple tunnels, OpenVPN must distinguish between them beyond just the pre-shared key. To achieve this, assign either unique IP addresses or unique ports to each tunnel.
Verify OpenVPN status using the show openvpn operational commands.
vyos@vyos:~$ show openvpn site-to-site

OpenVPN status on vtun1

Client CN    Remote Host        Tunnel IP    Local Host    TX bytes    RX bytes    Connected Since
-----------  -----------------  -----------  ------------  ----------  ----------  -----------------
N/A          10.110.12.54:1195  N/A          N/A           504.0 B     656.0 B     N/A
Server-client
In OpenVPN’s server-client mode, the server acts as a central hub, allowing multiple clients to connect and securely route their traffic or access a private network. Multi-client server is the most popular OpenVPN mode for routers.
Set up server-client certificates
Server-client mode always uses x.509 authentication and therefore requires a PKI setup. The PKI utility now simplifies the creation of Certificate Authorities (CAs), server and client certificates, and Diffie-Hellman keys directly in VyOS using configuration or operational mode commands.
On the server, generate all certificates by running the following commands in configuration mode. The certificates will be added to the configuration session’s PKI subtree.
Certificate Authority (CA):
vyos@vyos# run generate pki ca install ca-1
Enter private key type: [rsa, dsa, ec] (Default: rsa)
Enter private key bits: (Default: 2048)
Enter country code: (Default: GB)
Enter state: (Default: Some-State)
Enter locality: (Default: Some-City)
Enter organization name: (Default: VyOS)
Enter common name: (Default: vyos.io) ca-1
Enter how many days certificate will be valid: (Default: 1825)
Note: If you plan to use the generated key on this router, do not encrypt the private key.
Do you want to encrypt the private key with a passphrase? [y/N]
2 value(s) installed. Use "compare" to see the pending changes, and "commit" to apply.
[edit]
vyos@vyos# compare
[pki]
+ ca ca-1 {
+     certificate "MIIDlzCCAn+gAwIBAgIUQW7AtPu0Qzp7VzT0TyYx83/ME8swDQYJKoZIhvcNAQELBQAwVDELMAkGA1UEBhMCR0IxEzARBgNVBAgMClNvbWUtU3RhdGUxEjAQBgNVBAcMCVNvbWUtQ2l0eTENMAsGA1UECgwEVnlPUzENMAsGA1UEAwwEY2EtMTAeFw0yNTA2MTExMTIyMjJaFw0zMDA2MTAxMTIyMjJaMFQxCzAJBgNVBAYTAkdCMRMwEQYDVQQIDApTb21lLVN0YXRlMRIwEAYDVQQHDAlTb21lLUNpdHkxDTALBgNVBAoMBFZ5T1MxDTALBgNVBAMMBGNhLTEwggEiMA0GCSqGSIb3DQEBAQUAA4IBDwAwggEKAoIBAQDi+v6i241T9ABxq1ngjWxDQITkqjV0nq2Jb3HSSuQpXRCu7DWdQZlbvnMHnkV/WTL0RNgkhS4iV/WYhE+bLihwiZ0GTeQnUd1QJSkusFROX46w6kKXYUR5IQtcBC+vdky8PESynPd+DXsJn5X9JTWqDeviUAQz/ZjDzWk+71MBCqa+Zps1zpIjK0ywn7pR/HnDrxJOQXlBMNgvbv8U3IAZ2jJp0jTB8TnuDtWSA+XZejMm/EN/AWUQyliX6OJFSCIhBL2BZ9lmVms4/HkRpbd50k3vvCoz+lAOEE6VsH0fEdLC3lZ+CtXZ7kjp2wdWWuSs5ggIJYZZkixsCisbtEmbAgMBAAGjYTBfMA8GA1UdEwEB/wQFMAMBAf8wDgYDVR0PAQH/BAQDAgGGMB0GA1UdJQQWMBQGCCsGAQUFBwMCBggrBgEFBQcDATAdBgNVHQ4EFgQUAG9lvr7AzJ/y4vY/XlWxXru+6m0wDQYJKoZIhvcNAQELBQADggEBAKsu4eZa8Fha9aKfuKqlGQHPpEFfVDaVJmebw0uMw+b5Y8EpBxzZrgbqbk3Mty8pBjNa9jkZzph04gHN4pR6kg3iQlUKGxZUfsB9ZUjKhkgNdUI9zq1323MKEvuIuYdt61DCfBHwY6Xax5Ge+BahR2bXdPaQH452/+xMTqkukkpLbioTeIDg6FCU2HYPY5emDF5DDZAZWXtTqi0zdT3Y6FqiTvs5VuWwXCcp+HM+Lwe1/VVJhwi4CHTq0CKWnQIH5blYjmyxzRBlrlZm4ntWlL5Mtepa1A3DJirY4kw/SqMAAh/Q9lh41JzBc8epf+OdnOzK55YmtmctGO2o+NBCFi0="
+     private {
+         key "MIIEvgIBADANBgkqhkiG9w0BAQEFAASCBKgwggSkAgEAAoIBAQDi+v6i241T9ABxq1ngjWxDQITkqjV0nq2Jb3HSSuQpXRCu7DWdQZlbvnMHnkV/WTL0RNgkhS4iV/WYhE+bLihwiZ0GTeQnUd1QJSkusFROX46w6kKXYUR5IQtcBC+vdky8PESynPd+DXsJn5X9JTWqDeviUAQz/ZjDzWk+71MBCqa+Zps1zpIjK0ywn7pR/HnDrxJOQXlBMNgvbv8U3IAZ2jJp0jTB8TnuDtWSA+XZejMm/EN/AWUQyliX6OJFSCIhBL2BZ9lmVms4/HkRpbd50k3vvCoz+lAOEE6VsH0fEdLC3lZ+CtXZ7kjp2wdWWuSs5ggIJYZZkixsCisbtEmbAgMBAAECggEAZdykF6wV8Z4n8NsoG4j8E/ZJbWEhWjO3x1y3JNutJw735LhmmysMSsreToXtxGfgYRTgNwt5l7oHoqmGHCsLxO1NBb5A7JBllIkIwUYqn31syOJofg0NsJpuwZ2zVLfvWe5mGg4tV2lvVPNEWXWwbp+Ow2KLcFWXkA+H8tFuW6F2mH3ntYlIi/WiCNjsEotNx8Kk7OVwt43DbkN/rbF5lxquuLedaSspOHuhIAOfZB5ZySfqohQalSAaguVD66rGPMrerZ2Vc7B1iJ6Mn/KZrSaQeHwyWrwDDHdzVwG9waydevtGTVO0dvH4etWnRypDx8p1FPJJKD4XVcsl3rR6oQKBgQD497Ep2RJcbNnKVj+kNXGriSGmyRSp6CL61KotepzgucK0RtGMeFJge56/otMHMAxIOcDMX6vRn2MB2pqVqwqUBQy6JfLrSemdpIjMN9xlX6Dw3BWP39SdewZ896/Eo0Q1ythMj1ORp+u3PqOlSa14Cy9aPwDWmNy2deD68YDnsQKBgQDpZE/T84BMQ0FzL6NRijZRzR6Dc775hRfmmSTYI0KqpG0gXNSc5UgrWSLN5H7fnx36mT01P7UkgXCInV0AlJOfkt4a8QTqM1Fh/rZbLLWpQE55S6Fs28GDiFYl2kvZT/TtxhA/E0POf/YXl/8KITS7ZVAZxE8rxBe1hVUfDbnlCwKBgQDeWUguGaGeTdCMNk8MNnbYPdaCAB+mRp3G6ls51sF4qi5Lltva2jKn3H/AoohZaP3vGzUm0WLACdsAct2QQXtnCsN9FBtJK2+qzKEn0dPR7X/s3IGdRse6BX+b6BFgSnfGmuxmI7L86L1JoHXCTnTQOx0FOjNjdI3ZnplZRIpdYQKBgFJacASU9l9yl+SiGZnLEDG7FBpEPE3lVbKrtSGDB6IY1NzHhMo76URKdop6Jv6XMcfcTIm+ihdwiRnblRaAVrrG4xJUm2xcYUoXy5bOZudq5oXMVxCHVngoImXG6l6q5P0Fl3P6Q0HZSye2HWsgnm/FZwdAisMhtU/61TdY65BTAoGBAM4jKeImiXta5lz1RgNiW/TPhft3UbOLj3TbzchNCNAamqCv4Tmh9YKB2d/mz2hNxbnAGe2cYn4iRYKcjJLMZ0UfBL2WxlrgQYQPPGzSD0fH1pLIXPohpBZpsGqNR3Nc8Jd+Uw3IiIJ2oxPCOPTOJsklNB0Xf1AlUUagB16bhhZZ"
+     }
+ }

[edit]
vyos@vyos# commit
Server certificate:
vyos@vyos# run generate pki certificate sign ca-1 install srv-1
Do you already have a certificate request? [y/N] N
Enter private key type: [rsa, dsa, ec] (Default: rsa)
Enter private key bits: (Default: 2048)
Enter country code: (Default: GB)
Enter state: (Default: Some-State)
Enter locality: (Default: Some-City)
Enter organization name: (Default: VyOS)
Enter common name: (Default: vyos.io) srv-1
Do you want to configure Subject Alternative Names? [y/N]
Enter how many days certificate will be valid: (Default: 365)
Enter certificate type: (client, server) (Default: server) server
Note: If you plan to use the generated key on this router, do not encrypt the private key.
Do you want to encrypt the private key with a passphrase? [y/N]
2 value(s) installed. Use "compare" to see the pending changes, and "commit" to apply.
[edit]
vyos@vyos# compare
[pki certificate]
+ srv-1 {
+     certificate "MIIDrDCCApSgAwIBAgIULpu+qZjfG01kUI58XNmqXbQC3qQwDQYJKoZIhvcNAQELBQAwVDELMAkGA1UEBhMCR0IxEzARBgNVBAgMClNvbWUtU3RhdGUxEjAQBgNVBAcMCVNvbWUtQ2l0eTENMAsGA1UECgwEVnlPUzENMAsGA1UEAwwEY2EtMTAeFw0yNTA2MTExMTMxMDJaFw0yNjA2MTExMTMxMDJaMFUxCzAJBgNVBAYTAkdCMRMwEQYDVQQIDApTb21lLVN0YXRlMRIwEAYDVQQHDAlTb21lLUNpdHkxDTALBgNVBAoMBFZ5T1MxDjAMBgNVBAMMBXNydi0xMIIBIjANBgkqhkiG9w0BAQEFAAOCAQ8AMIIBCgKCAQEAysTrMfVH63aVidJT7bIf+zLwkLse07nGsv4aliGEbufr239RBHV4Jn8LbQ+nB/8mhYGjNY4OnZ7NYz3FU/iglo8qFtaZ26mWtPWpv2xW1F8JAEK7l5BAg42cBucxiIZFeRm+jkE6VN1bcNU0utnn3sbCwZMyH6pS9k08G1qrrFLA7ZFhv5AmgJcODmO8sigSAu7rRS/6O3eO6ICnVjvIfHLb+9DKKUEffHzFV8RrkqVCGmgisz9fF+j1Rvg9s+ylNc2lZJTbb1XnzixvSRro4t9I3uIWdpJ0iOu09YiTXGQgH9ER6V3rFiX00RdSiSXf+MJCV64hC1msg+8V3Nrw9QIDAQABo3UwczAMBgNVHRMBAf8EAjAAMA4GA1UdDwEB/wQEAwIHgDATBgNVHSUEDDAKBggrBgEFBQcDATAdBgNVHQ4EFgQUzH0h4vBxma89HF9rUQ+DW052c5swHwYDVR0jBBgwFoAUAG9lvr7AzJ/y4vY/XlWxXru+6m0wDQYJKoZIhvcNAQELBQADggEBAI/Cyd0y7AJ7wY3yRssCud2iJAl9/ZjgxzXOUo6ibawYIYOnSf9tS3eD4CIH4BgppDXoJZ/qEA4WvIsLx3yvnyOxiqyk3TQmKIZ27VJH+yQkgzPeiKrHn1pCXBKEb1/jlT8Ozu4Lmn/oFwDH6nk8toxI8DM+qsTxqUFlTA3ea9yaRtxeNPMWJdaxZSUYGVSZL0wVKw5ZuQ1Gn7vGVApWlYDKYbMozCuZUG1q8wMzFBRa7x0anvh5hM4bksLz+Y1ujCS8f8b4Xtb8KIdFrZtTvtl97crv62bN05VueAcbwtYbIBNWNoT/CvmqV7k3uPg95GYSNddFqEMbQHoyd8hdDCo="
+     private {
+         key "MIIEvQIBADANBgkqhkiG9w0BAQEFAASCBKcwggSjAgEAAoIBAQDKxOsx9UfrdpWJ0lPtsh/7MvCQux7Tucay/hqWIYRu5+vbf1EEdXgmfwttD6cH/yaFgaM1jg6dns1jPcVT+KCWjyoW1pnbqZa09am/bFbUXwkAQruXkECDjZwG5zGIhkV5Gb6OQTpU3Vtw1TS62efexsLBkzIfqlL2TTwbWqusUsDtkWG/kCaAlw4OY7yyKBIC7utFL/o7d47ogKdWO8h8ctv70MopQR98fMVXxGuSpUIaaCKzP18X6PVG+D2z7KU1zaVklNtvVefOLG9JGuji30je4hZ2knSI67T1iJNcZCAf0RHpXesWJfTRF1KJJd/4wkJXriELWayD7xXc2vD1AgMBAAECggEACsUk3PVzSX11+ekTDigM7NHK11UpEQPoGu/GR70mBKIK9BCyI/N9W0YaPEO9kn4p9KNrINgXzKV3sVLBnXEyTmzyRl5Fs9YxLBF0X7eIcSVPHBVvU2CVHKez5uX2ypKfNAx7A6FRUNqlFbwtXdNfLoUOKSwBWI86ctytWaKaRb/TTSGQkaP/z/cwIsXOLfG9m6iFkw98ShUzalrUWNo/4fJKlO1+DvXVYE9sv9rjD8J7DtAbr5KykQ5n0AAlZTCWQ7jwMybSnjjY9ypZUms0l17raJrfhrdbWayc6xMDvtrmNIDebkF+J7cHU06aEV+yQXV/7yjyZgUSM2ANcHMdzQKBgQDmTi5tUeaj1JUSl9lAP/XUzcElw2tcU1B8qpX69J4ofjTNgj5okLWQZVIy1UyAfLOI3LJbHTBUtSvedhH0VaMulq99NXs5qnbPGG3//RBAc0wKhJknB5Qv0D3FxMI14kMO6jzPly+aIGEk4dTtHvZuHbbVHbKSZ5MMouLyT+SS7wKBgQDhZETARZ0MazeWRaPJwdkjlfNcqqcsnDicdcppCkcDCjeLxkVPZc8ej37rshOvw2Pf1D0PddGyOhJoWCWA8QE2LQoDHLaDnQ0L6aQ3yjN5Gxx9RCDFi3Zuat/mPcv3tFO7uUmeYvRC5fGYrghq29NADmUefOopAc06Izd4A3iqWwKBgQC1uPrpR7a1jwgRo7/I8q8HO1MseQY903+u3ut5GYuyZ+NCRYL4/zZEua4ibivvNnZzh7E0M9PvAwWag4+nO+uG11+hbJHO7rLQtnYVh5lLQa6+neI66cAD+kzDwH1+BwriufFB3Amzk9kTQR7B+6x3NvsNLmG5JADj96Mbj+7MAQKBgFIevEXplyzdK6WevexWqoyip8aNjtdcG+w1pofa7MCYymAs3zfseihCVBYADdguModsxsqJPNvY+Lf31cJDDRP2GP3FSmJtqEE84U5KZ7KqRBkH54DSLVZRrj4vKc+YbiGpgr8ogqKVMQ9V6U81xKREGmefT5mdRG74Qc+CREadAoGAFtdsH5js1yFEeGFad4BZJ69grEavD3pNCfIe9oIPtXvvFdzxd+QbKgqFf3JMJp/HYi8A0iv/i4mzf00KXzF4JU7bIJYrUVlk/w8x77gzDRIphsPqpMBJkTI0jisQHZKWNEe7IbmM/dWW2S4jvCkrhB7F5Szf72Q+j/lPbfx2g/8="
+     }
+ }

[edit]
vyos@vyos# commit
Diffie-Hellman key:
vyos@vyos# run generate pki dh install dh-1
Enter DH parameters key size: (Default: 2048)
Generating parameters...
1 value(s) installed. Use "compare" to see the pending changes, and "commit" to apply.
[edit]
vyos@vyos# compare
[pki]
+ dh dh-1 {
+     parameters "MIIBCAKCAQEAp25kxwZeLZ7wcbRii5E5RD4uWCUOBxarzKEE0msa84omh5nZ9dv/4bfJw4gIXlA2+sGc2lLV/jajZminMryiSwJdisyVuUdOB7sJWZwrzHBAY0qFbNyaRMVJBar2xVm+XcKd3A2eNTEgn10G7rPPvf6CJ5isUKFaKT8ymUv+mI0upLneYdGs8/yS3sAojzeulCf49fa5SiaGCcZZkdOI3Nby1u/ZG4okqJ2wE2c2hRVLs1k5qrrono0OF4Dh0B91ihnywRfp1xPYeqpiln+OPh+PPgTuBxkz4VxwRDoQ+NhVr/LOCb3vbhnyFisxI0w4r3109cA3QiDmo1L14aKl1wIBAg=="
+ }

[edit]
vyos@vyos# commit
Client certificate:
vyos@vyos:~$  generate pki certificate sign ca-1 install client1
Do you already have a certificate request? [y/N] N
Enter private key type: [rsa, dsa, ec] (Default: rsa)
Enter private key bits: (Default: 2048)
Enter country code: (Default: GB)
Enter state: (Default: Some-State)
Enter locality: (Default: Some-City)
Enter organization name: (Default: VyOS)
Enter common name: (Default: vyos.io) client1
Do you want to configure Subject Alternative Names? [y/N]
Enter how many days certificate will be valid: (Default: 365)
Enter certificate type: (client, server) (Default: server) client
Note: If you plan to use the generated key on this router, do not encrypt the private key.
Do you want to encrypt the private key with a passphrase? [y/N]
You are not in configure mode, commands to install manually from configure mode:
set pki certificate client1 certificate 'MIIDrjCCApagAwIBAgIUPvtffeYTdoOiHxu++wdrjHwwVX4wDQYJKoZIhvcNAQELBQAwVDELMAkGA1UEBhMCR0IxEzARBgNVBAgMClNvbWUtU3RhdGUxEjAQBgNVBAcMCVNvbWUtQ2l0eTENMAsGA1UECgwEVnlPUzENMAsGA1UEAwwEY2EtMTAeFw0yNTA2MTExMTQxMDlaFw0yNjA2MTExMTQxMDlaMFcxCzAJBgNVBAYTAkdCMRMwEQYDVQQIDApTb21lLVN0YXRlMRIwEAYDVQQHDAlTb21lLUNpdHkxDTALBgNVBAoMBFZ5T1MxEDAOBgNVBAMMB2NsaWVudDEwggEiMA0GCSqGSIb3DQEBAQUAA4IBDwAwggEKAoIBAQC9H6E6gm0PfXO1n/WoA9xlg89/bnScLmfztVDn1uyNn8epE6zAi2GWBhtj4ixLllIwLdkJ7L2mF3yUZtA1Q0oYbGIqTbnaZ37JydCygVGnlLT7UX9zfRfS3KebCIvIte7OyCmnUfVfFzdIsp+4LI3S2wX/9Vyn4UBAR8QQNbezRB3XPMk9gzULnuLhmEDP6GVcPq7RzGXoXUMqsCxfEOJBjej0y4ANKH07HGVVrfVRiY+zlGkM4TFjVuZKnEA0BO6dhOA0E+7gsIXsC06UzzatkjsyWHpb2/DOECIifBoYej9DITu8VxyyZmgaINHEn2gGb0LRHO7rvQapc+XZ2z9DAgMBAAGjdTBzMAwGA1UdEwEB/wQCMAAwDgYDVR0PAQH/BAQDAgeAMBMGA1UdJQQMMAoGCCsGAQUFBwMCMB0GA1UdDgQWBBQnUyqEzG+AqZzsdSud5MDqsOxiXTAfBgNVHSMEGDAWgBQAb2W+vsDMn/Li9j9eVbFeu77qbTANBgkqhkiG9w0BAQsFAAOCAQEAplItvZpoX/joG3QREu9tHVKwDTmXB2lwUM5G8iKPgd6D6oOILZMe2KuvWt12dcdEzUCGfJwJJ8M8R2WD0OmcLdFqvM/8UM1hYzUP2BCnFCLtElVD+b4wMlQNpdHqNbdckw8J4MLQlhUgu9rZAZ0XjWCprr+U50bX++vYRw7Un3Ds6ETEvjflm5WAPb2e0V1hhISPl8K+VXO7RAwxy0DHcDuR+YaD+hnNgMsJV3/QwA17Iy8x86RpOgqmesbt0U7e9Rmo81aVgiy/V4OCV7u6bPX03fmZNS8UwwJuRUlxkjO+epHNYB2cnOcjSkUxaIJ9Hv3tMWHQEtbVZsNYSOZozw=='
set pki certificate client1 private key 'MIIEvAIBADANBgkqhkiG9w0BAQEFAASCBKYwggSiAgEAAoIBAQC9H6E6gm0PfXO1n/WoA9xlg89/bnScLmfztVDn1uyNn8epE6zAi2GWBhtj4ixLllIwLdkJ7L2mF3yUZtA1Q0oYbGIqTbnaZ37JydCygVGnlLT7UX9zfRfS3KebCIvIte7OyCmnUfVfFzdIsp+4LI3S2wX/9Vyn4UBAR8QQNbezRB3XPMk9gzULnuLhmEDP6GVcPq7RzGXoXUMqsCxfEOJBjej0y4ANKH07HGVVrfVRiY+zlGkM4TFjVuZKnEA0BO6dhOA0E+7gsIXsC06UzzatkjsyWHpb2/DOECIifBoYej9DITu8VxyyZmgaINHEn2gGb0LRHO7rvQapc+XZ2z9DAgMBAAECggEAPS/Fhtt5k2BgFivZW3FcVc+OS0keGwV8hkFsGoXTZIKEIzSFWIn/mX0CUY90C0Rn9MRwiqB4PwssOAsHY6QQjdRK8irRbVK8l2ZeydHC7DfVUdXtKR0YnxTaePML3nTV/TqPF14Rx6EINtHrkLeBbu2DhGsKfhoHIoTVbvUiKLHa2TkGJOkhvjsyMSPKzUXa1AzLmu+UBIhRYpEPHj0SQUUJJnKgIb7mTR2fhJScHcKwsrPq6S8OpChvsYZ6zatgrTFz9tuhD4IjL7NBiYP45BwGaLIaQjph8yAJwwHWoOP+TTj5WYflkW6Uu8F9gC0ve6dPGPNEi2TUdirvAe4LYQKBgQD0UfAPm6tQg8pdkvfMBvYc21fk8zqmgcA4OtvDi60aXuv5jI5+faISvOG2JLuFhKIDOb5ZerzGvkN+LvWgzr9H7YdGZNNtwKgpS/MGqcuuHncTxWBAwYgKhf26a/tqFZRNurJ6GowxDiAcQEc1mWnmdngRa+dvvCwNbXvGVqfVEQKBgQDGKi447TqD76QfvRPn/fRSjM+QE1duk+XorEJ0HHIha5HV9kCrZdV/olGRjDLwPJO6JW7iE2FUsS9SsIrccFE/9P2ZUqfYP2wL5vNO5kAmoLLUl0gwqg1WnBTPJfXeKReTj2uGmOdEuuMPXpL/49hDuPViiE2Q4MGe2Z+oEYN/EwKBgHfQMuTEl2e9qaDn8OM6SrluC5V4fjunh6dLnfgwaCx1fk1702lOnQuJWzsiml9o4raoO6PP4AGqzphz2PsKSJ2ya1NnIJRDFXRjDYQoAn2Z7RViBsja36chfINObxXgDUFtHBdrK3LnFXIlR4aOfHOLh2grvWx7IDNZjIiAeH+xAoGAJlmFZnjqiRv4bDgAQTZRcSRVCvHjSsAOj0++8I+MutEBgSHN9B2aCsBT/tHeDcX7ZNvXsKLFhElh+iO2S+DkqHb2GRT47I2hkFAaqBtBMPiKgz/ftaNDP46nLEuRYHQdXu4zhfHTV+a/CHtqAWGLuddyjaYJNM96SQ6eqjzxcMcCgYAzdxOF2e27hIgo2ttjsROMGqW0/0r/HsKGKPnao7xHQNCAswTnBT+QGugPCe0NXjuxbySP7V1GeWMWF+WV5khtteWerT1/ELAC48NSDpaMxVa4GP8Q/0w6+ZyJty3UGbCYQzZZue81dU+42LUIaVJ4NAc2tYj3jD780udasawS6w=='
Manually copy the CA, client certificate, and Diffie-Hellman key to the client device, then commit them before configuring the OpenVPN interface.
For more options, refer to PKI.
Set up server-client OpenVPN
The following example demonstrates the most complicated scenario: each client acts as a router with its own subnet (e.g., an HQ and multiple branch offices). Simpler setups are subsets of it.
In this scenario, the 10.23.1.0/24 network is used for client tunnel endpoints, and all client subnets belong to 10.23.0.0/20. Each client needs access to the 192.168.0.0/16 network.
Server configuration:
set interfaces openvpn vtun10 encryption data-ciphers 'aes256'
set interfaces openvpn vtun10 hash 'sha512'
set interfaces openvpn vtun10 local-host '172.18.201.10'
set interfaces openvpn vtun10 local-port '1194'
set interfaces openvpn vtun10 mode 'server'
set interfaces openvpn vtun10 persistent-tunnel
set interfaces openvpn vtun10 protocol 'udp'
set interfaces openvpn vtun10 server client client1 ip '10.23.1.10'
set interfaces openvpn vtun10 server client client1 subnet '10.23.2.0/25'
set interfaces openvpn vtun10 server domain-name 'vyos.net'
set interfaces openvpn vtun10 server max-connections '250'
set interfaces openvpn vtun10 server name-server '172.16.254.30'
set interfaces openvpn vtun10 server subnet '10.23.1.0/24'
set interfaces openvpn vtun10 server topology 'subnet'
set interfaces openvpn vtun10 tls ca-certificate ca-1
set interfaces openvpn vtun10 tls certificate srv-1
set interfaces openvpn vtun10 tls dh-params dh-1
The configuration above uses the default 1194/UDP port, 256-bit AES encryption, SHA-512 for HMAC authentication, and the persistent-tunnel option. Persistent-tunnel is recommended as it keeps the TUN/TAP device active during connection resets or daemon reloads. Clients are identified by the CN attribute in their SSL certificates.
To grant clients access to a specific network behind the router, use the push-route option to automatically install the appropriate route on each client.
set interfaces openvpn vtun10 server push-route 192.168.0.0/16
OpenVPN does not automatically create kernel routes for client subnets when clients connect; it only uses client-subnet association internally. Therefore, you must manually create a route to the 10.23.0.0/20 network:
set protocols static route 10.23.0.0/20 interface vtun10
Set up OpenVPN client
VyOS can operate not only as an OpenVPN site-to-site peer or a server for multiple clients, but also as an OpenVPN client. Any VyOS OpenVPN interface can be configured to connect to another VyOS or third-party OpenVPN server.
Client configuration:
set interfaces openvpn vtun10 encryption data-ciphers 'aes256'
set interfaces openvpn vtun10 hash 'sha512'
set interfaces openvpn vtun10 mode 'client'
set interfaces openvpn vtun10 persistent-tunnel
set interfaces openvpn vtun10 protocol 'udp'
set interfaces openvpn vtun10 remote-host '172.18.201.10'
set interfaces openvpn vtun10 remote-port '1194'
set interfaces openvpn vtun10 tls ca-certificate ca-1
set interfaces openvpn vtun10 tls certificate client1
Verification
Check the tunnel status:
vyos@vyos:~$ show openvpn server

OpenVPN status on vtun10

Client CN    Remote Host         Tunnel IP    Local Host        TX bytes    RX bytes    Connected Since
-----------  ------------------  -----------  ----------------  ----------  ----------  -------------------
client1      172.110.12.54:33166  10.23.1.10   172.18.201.10:1194  3.4 KB      3.4 KB      2024-06-11 12:07:25
Server bridge
In Ethernet bridging configurations, an OpenVPN interface operating in server mode with the device type set to TAP can be added to a bridge. By encapsulating entire Ethernet frames (up to 1514 bytes) rather than just IP packets (up to 1500 bytes), this setup enables clients to transmit Layer 2 frames through the OpenVPN tunnel.
The following is a basic configuration example:
Server side:
set interfaces bridge br10 member interface eth1.10
set interfaces bridge br10 member interface vtun10
set interfaces openvpn vtun10 device-type 'tap'
set interfaces openvpn vtun10 encryption data-ciphers 'aes192'
set interfaces openvpn vtun10 hash 'sha256'
set interfaces openvpn vtun10 local-host '172.18.201.10'
set interfaces openvpn vtun10 local-port '1194'
set interfaces openvpn vtun10 mode 'server'
set interfaces openvpn vtun10 server bridge gateway '10.10.0.1'
set interfaces openvpn vtun10 server bridge start '10.10.0.100'
set interfaces openvpn vtun10 server bridge stop '10.10.0.200'
set interfaces openvpn vtun10 server bridge subnet-mask '255.255.255.0'
set interfaces openvpn vtun10 server topology 'subnet'
set interfaces openvpn vtun10 tls ca-certificate 'ca-1'
set interfaces openvpn vtun10 tls certificate 'srv-1'
set interfaces openvpn vtun10 tls dh-params 'dh-1'
Client side:
set interfaces openvpn vtun10 device-type 'tap'
set interfaces openvpn vtun10 encryption data-ciphers 'aes192'
set interfaces openvpn vtun10 hash 'sha256'
set interfaces openvpn vtun10 mode 'client'
set interfaces openvpn vtun10 protocol 'udp'
set interfaces openvpn vtun10 remote-host '172.18.201.10'
set interfaces openvpn vtun10 remote-port '1194'
set interfaces openvpn vtun10 tls ca-certificate 'ca-1'
set interfaces openvpn vtun10 tls certificate 'client-1'
Server LDAP authentication
LDAP
Enterprise installations usually include a directory service to centralize employee password management. VyOS and OpenVPN support using LDAP and Active Directory as a single user backend.
Authentication is performed by the openvpn-auth-ldap.so plugin, included
with every VyOS installation. To use it, you must create a dedicated
configuration file.
Best practice: Store the configuration file in the /config directory
to ensure it is preserved after image updates.
set interfaces openvpn vtun0 openvpn-option "--plugin /usr/lib/openvpn/openvpn-auth-ldap.so /config/auth/ldap-auth.config"
A sample configuration file is shown below:
<LDAP>
# LDAP server URL
URL             ldap://ldap.example.com
# Bind DN (If your LDAP server doesn't support anonymous binds)
BindDN          cn=LDAPUser,dc=example,dc=com
# Bind Password password
Password        S3cr3t
# Network timeout (in seconds)
Timeout         15
</LDAP>

<Authorization>
# Base DN
BaseDN          "ou=people,dc=example,dc=com"
# User Search Filter
SearchFilter    "(&(uid=%u)(objectClass=shadowAccount))"
# Require Group Membership - allow all users
RequireGroup    false
</Authorization>
Active Directory
A sample configuration file is shown below:
<LDAP>
  # LDAP server URL
  URL ldap://dc01.example.com
  # Bind DN (If your LDAP server doesn’t support anonymous binds)
  BindDN CN=LDAPUser,DC=example,DC=com
  # Bind Password
  Password mysecretpassword
  # Network timeout (in seconds)
  Timeout  15
  # Enable Start TLS
  TLSEnable no
  # Follow LDAP Referrals (anonymously)
  FollowReferrals no
</LDAP>

<Authorization>
  # Base DN
  BaseDN        "DC=example,DC=com"
  # User Search Filter, user must be a member of the VPN AD group
  SearchFilter  "(&(sAMAccountName=%u)(memberOf=CN=VPN,OU=Groups,DC=example,DC=com))"
  # Require Group Membership
  RequireGroup    false # already handled by SearchFilter
  <Group>
    BaseDN        "OU=Groups,DC=example,DC=com"
    SearchFilter  "(|(cn=VPN))"
    MemberAttribute  memberOf
  </Group>
</Authorization>
If you only want to check that the user account is enabled and can authenticate (against the primary group), the following snippet is sufficient:
<LDAP>
  URL ldap://dc01.example.com
  BindDN CN=SA_OPENVPN,OU=ServiceAccounts,DC=example,DC=com
  Password ThisIsTopSecret
  Timeout  15
  TLSEnable no
  FollowReferrals no
</LDAP>

<Authorization>
  BaseDN          "DC=example,DC=com"
  SearchFilter    "sAMAccountName=%u"
  RequireGroup    false
</Authorization>
A complete example of an LDAP authentication configuration for OpenVPN is shown below:
vyos@vyos# show interfaces openvpn
 openvpn vtun0 {
     mode server
     openvpn-option "--tun-mtu 1500 --fragment 1300 --mssfix"
     openvpn-option "--plugin /usr/lib/openvpn/openvpn-auth-ldap.so /config/auth/ldap-auth.config"
     openvpn-option "--push redirect-gateway"
     openvpn-option --duplicate-cn
     openvpn-option "--verify-client-cert none"
     openvpn-option --comp-lzo
     openvpn-option --persist-key
     openvpn-option --persist-tun
     server {
         domain-name example.com
         max-connections 5
         name-server 203.0.113.0.10
         name-server 198.51.100.3
         subnet 172.18.100.128/29
     }
     tls {
         ca-certificate ca.crt
         certificate server.crt
         dh-params dh1024.pem
     }
 }
For a detailed example, refer to OpenVPN with LDAP.
Multi-factor authentication
VyOS supports multi-factor authentication (MFA) or two-factor authentication using Time-based One-Time Passwords (TOTP). It is compatible with Google Authenticator and other software tokens.
Server side
set interfaces openvpn vtun20 encryption cipher 'aes256'
set interfaces openvpn vtun20 hash 'sha512'
set interfaces openvpn vtun20 mode 'server'
set interfaces openvpn vtun20 persistent-tunnel
set interfaces openvpn vtun20 server client user1
set interfaces openvpn vtun20 server mfa totp challenge 'disable'
set interfaces openvpn vtun20 server subnet '10.10.2.0/24'
set interfaces openvpn vtun20 server topology 'subnet'
set interfaces openvpn vtun20 tls ca-certificate 'openvpn_vtun20'
set interfaces openvpn vtun20 tls certificate 'openvpn_vtun20'
set interfaces openvpn vtun20 tls dh-params 'dh-pem'
A TOTP secret is created for each client in the OpenVPN server configuration.
To display authentication information, use the following command:
show interfaces openvpn vtun20 user user1 mfa qrcode.
Example:
vyos@vyos:~$ sh interfaces openvpn vtun20 user user1 mfa qrcode
█████████████████████████████████████
█████████████████████████████████████
████ ▄▄▄▄▄ █▀▄▀ ▀▀▄▀ ▀▀▄ █ ▄▄▄▄▄ ████
████ █   █ █▀▀▄ █▀▀▀█▀██ █ █   █ ████
████ █▄▄▄█ █▀█ ▄ █▀▀ █▄▄▄█ █▄▄▄█ ████
████▄▄▄▄▄▄▄█▄█ █ █ ▀ █▄▀▄█▄▄▄▄▄▄▄████
████▄▄ ▄ █▄▄ ▄▀▄█▄ ▄▀▄█ ▄▄▀ ▀▄█ ▀████
████ ▀██▄▄▄█▄ ██ █▄▄▄▄ █▄▀█ █ █▀█████
████ ▄█▀▀▄▄  ▄█▀  ▀▄ ▄▄▀▄█▀▀▀ ▄▄▀████
████▄█ ▀▄▄▄▀  ▀ ▄█ ▄ █▄█▀ █▀  █▀█████
████▀█▀ ▀ ▄█▀▄▀▀█▄██▄█▀▀  ▀ ▀ ▄█▀████
████ ██▄▄▀▄▄█ ██ ▀█ ▄█ ▀▄█  █▀██▀████
████▄███▄█▄█ ▀█▄ ██▄▄▄█▀ ▄▄▄ █ ▀ ████
████ ▄▄▄▄▄ █▄█▀▄ ▀▄ ▀█▀  █▄█ ██▀█████
████ █   █ █ ▄█▀█▀▀▄ ▄▀▀▄▄▄▄▄▄   ████
████ █▄▄▄█ █ ▄ ▀ █▄▄▄██▄▀█▄▀▄█▄ █████
████▄▄▄▄▄▄▄█▄██▄█▄▄▄▄▄█▄█▄█▄██▄██████
█████████████████████████████████████
█████████████████████████████████████
Scan the QR code to add the user account to Google Authenticator. On the client side, use the generated OTP as the password.
Authentication with username/password
An OpenVPN server can securely obtain a username and password from a connecting client and use this information for authentication.
First, configure the server to use an authentication plugin or script. The server calls this plugin every time a client tries to connect, passing it the client’s credentials.
In the following example, the --auth-user-pass-verify directive is used
with the via-env method and a specified script path to validate the client’s
username and password.
Server configuration
set interfaces openvpn vtun10 local-port '1194'
set interfaces openvpn vtun10 mode 'server'
set interfaces openvpn vtun10 openvpn-option '--auth-user-pass-verify /config/auth/check_user.sh via-env'
set interfaces openvpn vtun10 openvpn-option '--script-security 3'
set interfaces openvpn vtun10 persistent-tunnel
set interfaces openvpn vtun10 protocol 'udp'
set interfaces openvpn vtun10 server client client-1 ip '10.10.10.55'
set interfaces openvpn vtun10 server push-route 192.0.2.0/24
set interfaces openvpn vtun10 server subnet '10.10.10.0/24'
set interfaces openvpn vtun10 server topology 'subnet'
set interfaces openvpn vtun10 tls ca-certificate 'ca-1'
set interfaces openvpn vtun10 tls certificate 'srv-1'
set interfaces openvpn vtun10 tls dh-params 'dh-1'
The /config/auth/check_user.sh example includes two test users:
#!/bin/bash
USERNAME="$username"
PASSWORD="$password"

# Replace this with real user checking logic or use getent
if [[ "$USERNAME" == "client1" && "$PASSWORD" == "pass123" ]]; then
    exit 0
elif [[ "$USERNAME" == "peter" && "$PASSWORD" == "qwerty" ]]; then
    exit 0
else
    exit 1
fi
Client configuration
Storing the client certificate locally lets you generate the OpenVPN client configuration file. Use the following command:
vyos@vyos:~$ generate openvpn client-config interface vtun10 ca ca-1 certificate client1
Copy the output and save it as a .ovpn file. Add the auth-user-pass
directive to the file. This instructs the OpenVPN client to prompt the user
for a username and password, which are then sent to the server over the TLS
channel. You can now import this file into any OpenVPN client application.
client
dev tun
proto udp
remote 192.168.77.10 1194

remote-cert-tls server
proto udp
dev tun
dev-type tun
persist-key
persist-tun
verb 3
auth-user-pass


<ca>
-----BEGIN CERTIFICATE-----
MIIDlzCCAn+gAwIBAgIUQW7AtPu0Qzp7VzT0TyYx83/ME8swDQYJKoZIhvcNAQEL
BQAwVDELMAkGA1UEBhMCR0IxEzARBgNVBAgMClNvbWUtU3RhdGUxEjAQBgNVBAcM
CVNvbWUtQ2l0eTENMAsGA1UECgwEVnlPUzENMAsGA1UEAwwEY2EtMTAeFw0yNTA2
MTExMTIyMjJaFw0zMDA2MTAxMTIyMjJaMFQxCzAJBgNVBAYTAkdCMRMwEQYDVQQI
DApTb21lLVN0YXRlMRIwEAYDVQQHDAlTb21lLUNpdHkxDTALBgNVBAoMBFZ5T1Mx
DTALBgNVBAMMBGNhLTEwggEiMA0GCSqGSIb3DQEBAQUAA4IBDwAwggEKAoIBAQDi
+v6i241T9ABxq1ngjWxDQITkqjV0nq2Jb3HSSuQpXRCu7DWdQZlbvnMHnkV/WTL0
RNgkhS4iV/WYhE+bLihwiZ0GTeQnUd1QJSkusFROX46w6kKXYUR5IQtcBC+vdky8
PESynPd+DXsJn5X9JTWqDeviUAQz/ZjDzWk+71MBCqa+Zps1zpIjK0ywn7pR/HnD
rxJOQXlBMNgvbv8U3IAZ2jJp0jTB8TnuDtWSA+XZejMm/EN/AWUQyliX6OJFSCIh
BL2BZ9lmVms4/HkRpbd50k3vvCoz+lAOEE6VsH0fEdLC3lZ+CtXZ7kjp2wdWWuSs
5ggIJYZZkixsCisbtEmbAgMBAAGjYTBfMA8GA1UdEwEB/wQFMAMBAf8wDgYDVR0P
AQH/BAQDAgGGMB0GA1UdJQQWMBQGCCsGAQUFBwMCBggrBgEFBQcDATAdBgNVHQ4E
FgQUAG9lvr7AzJ/y4vY/XlWxXru+6m0wDQYJKoZIhvcNAQELBQADggEBAKsu4eZa
8Fha9aKfuKqlGQHPpEFfVDaVJmebw0uMw+b5Y8EpBxzZrgbqbk3Mty8pBjNa9jkZ
zph04gHN4pR6kg3iQlUKGxZUfsB9ZUjKhkgNdUI9zq1323MKEvuIuYdt61DCfBHw
Y6Xax5Ge+BahR2bXdPaQH452/+xMTqkukkpLbioTeIDg6FCU2HYPY5emDF5DDZAZ
WXtTqi0zdT3Y6FqiTvs5VuWwXCcp+HM+Lwe1/VVJhwi4CHTq0CKWnQIH5blYjmyx
zRBlrlZm4ntWlL5Mtepa1A3DJirY4kw/SqMAAh/Q9lh41JzBc8epf+OdnOzK55Ym
tmctGO2o+NBCFi0=
-----END CERTIFICATE-----

</ca>

<cert>
-----BEGIN CERTIFICATE-----
MIIDrjCCApagAwIBAgIUN6vPxDEW89cfbEFPa0tZlnsW1GkwDQYJKoZIhvcNAQEL
BQAwVDELMAkGA1UEBhMCR0IxEzARBgNVBAgMClNvbWUtU3RhdGUxEjAQBgNVBAcM
CVNvbWUtQ2l0eTENMAsGA1UECgwEVnlPUzENMAsGA1UEAwwEY2EtMTAeFw0yNTA2
MTExMTQ0MjlaFw0yNjA2MTExMTQ0MjlaMFcxCzAJBgNVBAYTAkdCMRMwEQYDVQQI
DApTb21lLVN0YXRlMRIwEAYDVQQHDAlTb21lLUNpdHkxDTALBgNVBAoMBFZ5T1Mx
EDAOBgNVBAMMB2NsaWVudDEwggEiMA0GCSqGSIb3DQEBAQUAA4IBDwAwggEKAoIB
AQCdOWq8vdO8CznGN83uAXCuN4PcdTJaRFEdJIEfqHjlcG0MZQuPIAlDbOU+IWmu
QBmeCj7SlbYtVYo1uQOMUaIrAvxLIQUaL1Y60oLVTF5eAPrGV+NSTQR5uMApcH9/
RcZcW530pu/QpYinKTbGkEd54so6YRVPmYbIOPNUMbnZbccpinYi5t2dqubBb585
A7L40043VtsVVbPjQq5V0HDursvqlaMqMRcffhR8H4B4ByU/EPRK4yTKm1hi19v3
UtRHiq74CfGtJzYtplgrLJBON7TsbIi/fEux4q1yhbKA0S66L6e5DZldRxNZOXG6
QjEL0RkYloMgkbv/2HLCu09hAgMBAAGjdTBzMAwGA1UdEwEB/wQCMAAwDgYDVR0P
AQH/BAQDAgeAMBMGA1UdJQQMMAoGCCsGAQUFBwMCMB0GA1UdDgQWBBQCkfdfq3hv
7UtqAxq/5VDRIdgJLTAfBgNVHSMEGDAWgBQAb2W+vsDMn/Li9j9eVbFeu77qbTAN
BgkqhkiG9w0BAQsFAAOCAQEAJ43+aDVRC+y2vsu6WRG2l6zYnLoIJZW4afdKMC1a
nhTWhj4AhAt8evhVbAxi/8qhQX3yXF2bUQKdS++8AVcvZFlSES32S5eBx83AwGLt
QkgvGx+QThKmoJwrelyuS2X0XX3P0WzohYI6HzSr6p9F8KhTvSW97E6SnldpdvEM
uG1C+61/Vys7WLmDBh1PZTGE03nRp3H4Q9ynyXEEf1MK3eZkzg5H3Evj66p82pD5
8IauRfghMHJf3tOC+y0YIoXshF3lPq4nYso5Jc/HGCHlsboCODMCnY3CZsH7/O1n
/MI710KpzZTCLnv4Qtx9JpZxR7FTddl36OOuYUXU3Gcnsg==
-----END CERTIFICATE-----

</cert>

<key>
-----BEGIN PRIVATE KEY-----
MIIEvQIBADANBgkqhkiG9w0BAQEFAASCBKcwggSjAgEAAoIBAQCdOWq8vdO8CznG
N83uAXCuN4PcdTJaRFEdJIEfqHjlcG0MZQuPIAlDbOU+IWmuQBmeCj7SlbYtVYo1
uQOMUaIrAvxLIQUaL1Y60oLVTF5eAPrGV+NSTQR5uMApcH9/RcZcW530pu/QpYin
KTbGkEd54so6YRVPmYbIOPNUMbnZbccpinYi5t2dqubBb585A7L40043VtsVVbPj
Qq5V0HDursvqlaMqMRcffhR8H4B4ByU/EPRK4yTKm1hi19v3UtRHiq74CfGtJzYt
plgrLJBON7TsbIi/fEux4q1yhbKA0S66L6e5DZldRxNZOXG6QjEL0RkYloMgkbv/
2HLCu09hAgMBAAECggEAOR3xRVUO9Sr816JRSQwz486eNDpNSxazgwtOb3JUTUH9
E7onq1y/kMOgOmSIEHoP9GaTcQxbbPe86IxomhLT/50ri52YzWzx/heY2SVPyQXB
FMo79putKw0vnj5UyydNiyLrbMQyrhFc5iFmWVdz5/c4cWHwjIThPp7V4znXYwHZ
OB/Xn1NNHDNy872oQn5wZWzuA4ml0OqjU5D+Ne9srODl3r4OTo3lb1N3JuH3aOSA
cACl1JnN/KElN8IotIdweeUFAdn2jsGjZnCpGaJvZQ+2iMn6doJXHgFiF5+GMF7o
aOatglElIuqgPtB/4nvnegSL0DSnB36ojqv2PAh24wKBgQDPBt4S4muqo8SqP2e0
8X78MyK3tz1VmgPKn3O68Vdi1V7FPz0RHRGsw/kdgxXsJlfZTWgzcq2NNFu0yPBJ
A/h7qo16mv8GW7cJCd2exjb+/oq4r5iWeqLdSsMUXN87x02LRaMNd9wz1mls1Z73
oQ5hJ7zTtlyYXnvKPQo8X1ImjwKBgQDCaptQxZ/a3tcUQQlXAFMAScviODZd0LCL
30ZalwpNs6nVVIPoZHD3tlzWN5Es74gndfkC7/Gm2cnsOW9QQaU56q+5LeNXItW8
rc6yXq3vNQerqJxHNUmKWwLCQtSyLRjFqpGTl/PyX2bGXQ7/zjTL3W8VMD5otf4Y
SJJB+sKjDwKBgHSVX3WvAAamFtfwwMwKuwH3IfPnQqj0BHKUfK2nvxgvJCFbzV3X
yt5Jtf3ClhPYO9xpVOa0C7va4lHaXkYf8Exj7SxAIKFKALccUStaYBoU6bW7XOhQ
w2pu8ZCEBEo7oBVv77Rj7SNb+R6K5ex5TAm2QQXQSjCb9IYc/ail3TNNAoGBALu6
GPMrgKnlFyV1j0E1DPBwUbDEuqpoArFtDRAYXFifLVTS4PQbWIG403f9++659Gy2
G5ZcfqiwD6xL4VJLsPF1zewvhR/0gRJJehb+GVGrkRaOHykbKUGxk75kreDGbu8f
PqaXyXS17hWIch1Lzes0jDiXdwvA//QOzztqmVq9AoGAVMbmf04+QtzckLolAP4q
Uwr5svfy14A7V3IGkwlsHZdm37L26lfxW0kpOOE7g7D6gdinuALo6oopP7RN/IDq
PLaaHaGrIoLAEVFa0bRLGsrU2q87ytwfSgdra4jmsTn+xEabdI4IgmqWgwSRvGVf
KN18e19Ssw5x7Wq0Rsw/3VM=
-----END PRIVATE KEY-----

</key>
When prompted, log in with the username and password.